
You wake up to find the ute door open, the toolbox emptied, and the trailer gone off the driveway. You’ve got cameras. You even paid extra for 4K. So you sit down with a coffee, scroll back to 2:40am, and there it is — a person walking straight past your garage.
Except you can’t tell if it’s a man or a woman. You can’t read the numberplate on the car parked at the kerb. You zoom in and the face turns into six grey squares. The footage tells you something happened. It doesn’t tell you who did it.
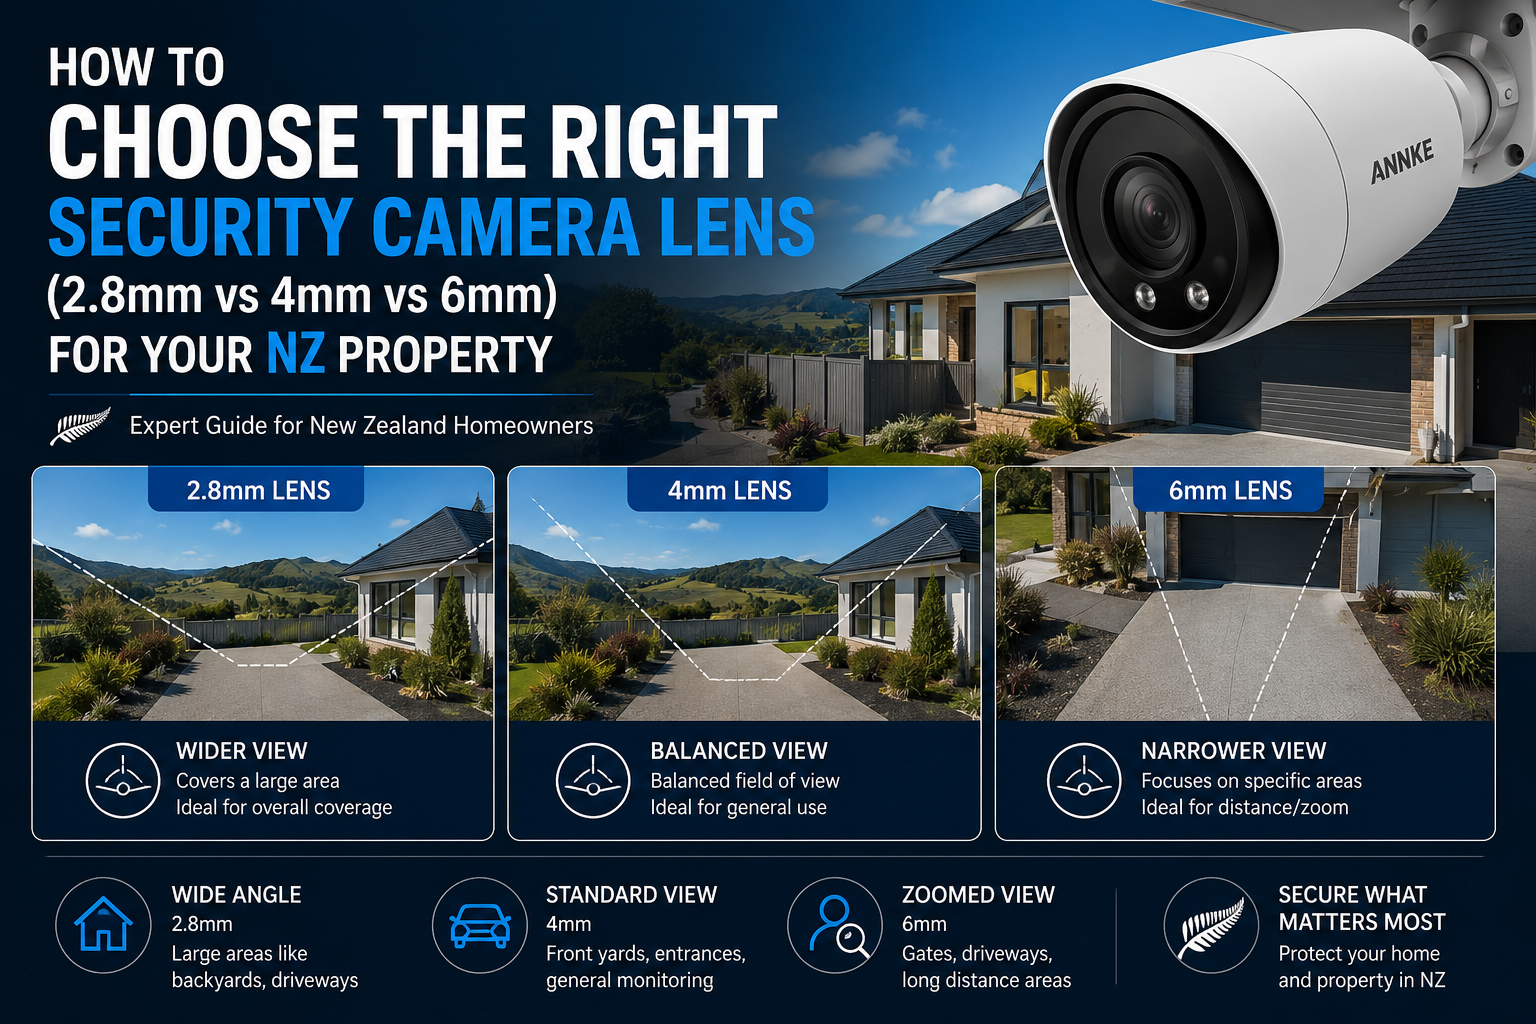
This happens to Kiwi homeowners constantly, and nine times out of ten the camera isn’t the problem. The lens is. Almost every camera sold in New Zealand ships with a fixed lens — usually 2.8mm — and that one number decides how wide your camera sees and how far away it can still recognise a face.
This security camera lens guide NZ walks you through the three lenses you’ll actually be choosing between: 2.8mm, 4mm and 6mm. No jargon for the sake of it. Just what each one covers, where it fails, and which one belongs on your front door, your driveway and your back gate.
The Short Answer
If you only read one section, read this one:
- 2.8mm — very wide view (around 100–110°). Best for small, close spaces where you want to see everything at once. Good face detail out to about 4–6 metres.
- 4mm — the all-rounder (around 80–90°). Best for driveways, side paths and standard front yards. Good face detail out to about 6–8 metres.
- 6mm — narrow and longer reaching (around 50–55°). Best for long driveways, farm races, carparks and fence lines. Good face detail out to about 9–12 metres.
Most New Zealand properties don’t need one lens — they need a mix. A typical setup is 2.8mm cameras at the doors, a 4mm on the driveway, and a 6mm looking down the long approach to the gate or shed.
Important: Those distances assume a 4MP camera. An 8MP (4K) camera on the same lens will stretch each figure further, because you’re spreading more pixels across the same view. Always check the camera’s own spec sheet before you commit.
What Is a Security Camera Lens (and Why Does mm Matter)?
The “mm” figure on a camera — 2.8mm, 4mm, 6mm — is the focal length. It’s the distance between the lens and the image sensor inside the camera.
You don’t need the physics. You need the trade-off, and the trade-off is simple:
A smaller number gives you a wider view but smaller-looking people. A bigger number gives you a narrower view but bigger, clearer-looking people.
Think of it like a torch. Pull the head back and you get a broad wash of light that covers the whole lawn but doesn’t reach far. Twist it to spot mode and you get a tight beam that shoots down to the end of the section. Same amount of light, spread differently. Your camera lens works the same way with your pixels.
That’s the part people miss. Your camera has a fixed number of pixels — say 2,560 across the frame on a 4MP camera. The lens decides how much real-world space those pixels have to cover.
- On a 2.8mm lens at 10 metres out, you’re covering roughly 24 metres of width. Those 2,560 pixels get spread thin.
- On a 6mm lens at the same 10 metres, you’re only covering about 10 metres of width. Same pixels, less than half the area — so more than double the detail on anyone standing there.
Nothing about the camera changed. Only the lens.
Key Concepts Explained (in Plain English)
CCTV viewing angle
The CCTV viewing angle — also called field of view — is how wide a slice of the world your camera can see, measured in degrees. Roughly:
- 2.8mm ≈ 100–110°
- 4mm ≈ 80–90°
- 6mm ≈ 50–55°
Exact figures shift depending on the sensor size, so treat these as ballpark and confirm on the product page.
Coverage width at a distance
More useful than degrees is how many metres wide the picture is at the spot you care about. Here’s what each lens covers:
| Distance from camera | 2.8mm | 4mm | 6mm |
|---|---|---|---|
| 5 metres | ~12 m wide | ~9 m wide | ~5 m wide |
| 10 metres | ~24 m wide | ~19 m wide | ~10 m wide |
| 20 metres | ~49 m wide | ~37 m wide | ~21 m wide |
Stand at your front door, look at where you’d mount the camera, and pace out the distance. Then check the table. If your driveway is only 4 metres wide and sits 10 metres from the camera, a 2.8mm lens is throwing about 20 metres of that view away on your neighbour’s hedge and the road.
DORI — the four things a camera can do
This is the concept that separates people who buy the right camera from people who buy twice. DORI comes from the European standard EN 62676-4, and manufacturers publish DORI distances for most decent cameras. It splits camera performance into four levels:
- Detect — you can tell someone is there. A shape moving.
- Observe — you can see clothing colour and general build.
- Recognise — you’d know it was your neighbour, because you already know your neighbour.
- Identify — you could pick a stranger out to Police. This needs about 250 pixels per metre.
Here’s the thing that shocks people: the Detect distance is often 8–10 times longer than the Identify distance. A 2.8mm 4MP camera might “detect” a person at 45 metres but only “identify” one at 5 metres. Marketing loves quoting the big number.
Key takeaway: When a listing says a camera “sees 40 metres”, that’s almost always the Detect figure. Ask what the Identify figure is. That’s the number that matters when something actually goes wrong.
Mounting height
Lens choice and mounting height work together. Mount a camera at 4 metres up under the eaves and you’ll get a beautiful view of the top of everyone’s head — which is useless for identification, no matter how good the lens is.
Aim for 2.5–3 metres for any camera whose job is identifying faces. High enough that nobody can reach it, low enough that you’re looking at people rather than down on them. Overview cameras can go higher.
Night vision and lens choice
An outdoor security camera lens affects night performance more than most people expect. Infrared LEDs have a fixed amount of light to give. A wide 2.8mm lens has to spread that light across a huge area, so it fades quickly. A 6mm lens is looking at a narrow corridor, so the same IR reaches much further.
Manufacturers usually match the IR to the lens, but the pattern holds: narrower lenses generally see further at night.
Barrel distortion
Wide-angle security camera lenses bend the image at the edges. Straight fence lines curve. Faces at the far left or right of the frame stretch sideways. It’s not a fault — it’s physics — but it means the useful part of a 2.8mm frame is the middle. Anything happening at the edges is lower quality than the specs suggest.
Option 1: The 2.8mm Lens (Wide-Angle Security Camera)
The 2.8mm is the default lens on most cameras sold in New Zealand, which is why so many people end up with it whether it suits their property or not.
Who it’s for
Anyone covering a small, enclosed, close-range area. Front porches. Back doors. Garage interiors. Hallways. Shop counters. Anywhere the action happens within about 5 metres and you’d rather see the whole space than see it in detail.
Pros
- Widest coverage of the three — fewer cameras needed for open areas
- Very few blind spots directly under and beside the camera
- Excellent for doorways, where someone can only be in one place anyway
- Cheapest and most widely stocked option
- Great for a “what happened here” overview camera
Cons
- Face detail drops off fast past 5 metres
- Numberplates are usually unreadable beyond about 4 metres
- Noticeable edge distortion
- Shortest effective night range
- Sees a lot of things you don’t want it to — the footpath, the road, the neighbour’s yard — which means more false motion alerts and more privacy considerations
NZ use case
A townhouse in Hobsonville with a 3-metre-deep entry alcove. The front door, the letterbox and the recycling bins are all within 4 metres of the eave. A 2.8mm camera mounted at 2.6 metres catches a courier’s face, their van door, and the parcel being lifted — all in one frame.
Put a 6mm on that same wall and you’d have a lovely close-up of the doormat while someone walks off with the parcel from just outside the frame.
Option 2: The 4mm Lens (The Kiwi All-Rounder)
If you could only buy one lens for a standard New Zealand section, this is it. The 4mm sits in the sweet spot for the distances most homes actually deal with.
Who it’s for
Homeowners covering a driveway, side path, back lawn, carport or standard front yard from a wall or eave 6–12 metres away. Also the go-to for small business entrances, café frontages and reception areas.
Pros
- Good balance — still wide enough for context, tight enough for faces
- Reliable face identification out to roughly 6–8 metres
- Much less edge distortion than 2.8mm
- Better night reach than 2.8mm
- Fits the geometry of a typical quarter-acre section almost perfectly
- Widely available, usually the same price as 2.8mm
Cons
- Not wide enough for tight entryways — you’ll get blind spots close to the wall
- Not long enough for a rural gate 40 metres out
- Still struggles with numberplates past 6–7 metres
- Can feel like a compromise if your property is unusually shaped
NZ use case
A 1970s brick-and-tile in Papanui with a 12-metre concrete driveway running down the side of the house to a garage. Camera mounted at the front corner of the house at 2.8 metres, angled down the drive.
A 4mm lens covers the full width of the drive, the gate, and the car — and gives usable face detail on anyone who walks past the front bumper. That’s the exact spot where trailer, tool and catalytic converter thefts happen in New Zealand suburbs.
For most Kiwi homes buying their first system, a couple of 4mm cameras plus one 2.8mm at the front door covers 80% of the risk.
Option 3: The 6mm Lens (Reach and Detail)
The 6mm is the lens most people don’t consider and later wish they had. It’s not a specialist product — it’s the right answer for a lot of New Zealand properties, especially outside the city.
Who it’s for
Anyone watching a long, narrow, or distant target: rural driveways, farm races, fence lines, boat ramps, self-storage rows, carparks, loading docks, orchard gates and shed doors 15+ metres away.
Pros
- Best face detail at distance — usable identification out to 9–12 metres on 4MP, further on 4K
- Best chance of a readable numberplate, especially at a gate or entry point
- Longest night vision reach of the three
- Minimal distortion — straight lines stay straight
- Naturally excludes the road and neighbouring properties, which cuts false alerts and reduces privacy headaches
Cons
- Narrow view means real blind spots — you must plan the angle carefully
- Usually needs more cameras to cover the same total area
- Poor choice for enclosed spaces or doorways
- Slightly less common in stock, so fewer model options
- Small mounting errors matter more; a few degrees off and you’re watching the wrong patch of gravel
NZ use case
A 4-hectare lifestyle block outside Cambridge. The house sits 60 metres back from the road, with a long shingle drive and a farm gate at the boundary. Quad bikes and diesel are the targets.
A 6mm camera on the shed corner pointed straight down the drive catches vehicles coming through the gate with enough detail to read a plate as they approach — because they’re driving towards the narrow view, which is exactly how you want to use a long lens. A 2.8mm in that position would show a distant, unidentifiable vehicle in the middle of a very wide picture of paddock.
Bonus Option: Varifocal and Motorised Zoom
Worth knowing about before you buy fixed lenses.
A varifocal camera has an adjustable lens — commonly something like 2.8–12mm — so you set the zoom during installation. A motorised zoom version lets you adjust it from your phone or NVR afterwards.
Who should consider it: anyone unsure of the right lens, anyone installing somewhere hard to reach, and any business likely to change its layout.
Pros: you can dial in the exact view, adjust later without a ladder, and stop guessing.
Cons: costs more, physically larger, and slightly more that can eventually fail.
If one camera position on your property is genuinely awkward — an odd angle, a long approach, a spot you can’t get a ladder to — spending extra on one varifocal there is usually smarter than buying three fixed lenses trying to find the right one.
Side-by-Side Comparison Table
| 2.8mm | 4mm | 6mm | |
|---|---|---|---|
| Horizontal view | ~100–110° | ~80–90° | ~50–55° |
| Width covered at 10m | ~24 m | ~19 m | ~10 m |
| Identify a stranger (4MP) | ~4–6 m | ~6–8 m | ~9–12 m |
| Detect movement (4MP) | ~40–50 m | ~50–55 m | ~80–90 m |
| Night reach | Shortest | Medium | Longest |
| Edge distortion | Noticeable | Mild | Minimal |
| Numberplate chance | Poor | Fair up close | Best |
| False alert risk | Highest | Medium | Lowest |
| Best for | Doors, porches, garages, small shops | Driveways, side paths, front yards, café frontages | Long drives, fence lines, carparks, farm gates |
| Avoid for | Anything past 6 m | Tight entryways and long rural drives | Doorways and enclosed spaces |
Figures are typical for a 4MP camera. Higher resolution extends the identification and detection ranges. Always confirm against the specific model’s DORI data.
How to Choose: A Step-by-Step Method
This is the process a professional installer follows. It takes about twenty minutes and saves buying the wrong gear.
Step 1 — Sketch the property and mark the risk points
Rough top-down drawing, back of an envelope is fine. Mark every place a thief would actually go: front door, back door, driveway, gate, shed, garage, letterbox, the spot where the boat sits, the till.
Step 2 — Give each camera one job
Every camera does either identify (I need to know who this is) or overview (I need to know what happened). Write one word next to each position. Don’t ask a single camera to do both — that’s the mistake that produces useless footage.
Step 3 — Measure the distance to the money spot
Not the distance to the far fence. The distance from the mount point to the exact place a person will be standing when you need to identify them. The garage door. The gate latch. The counter.
Use a tape measure or pace it out — one adult stride is roughly a metre.
Step 4 — Match the distance to the lens
- Under 5 metres → 2.8mm
- 5–9 metres → 4mm
- 9 metres and beyond → 6mm or varifocal
For overview cameras, go one step wider than the table suggests.
Step 5 — Check resolution against the distance
If your identify distance is longer than the lens comfortably handles, resolution is your other lever. Stepping from 4MP to 8MP on the same lens meaningfully extends how far you can identify a face. Sometimes an 8MP 4mm beats a 4MP 6mm because you keep the wider view and get the detail.
Step 6 — Confirm the mounting height
2.5–3 metres for identify cameras. If your only mounting option is high under a two-storey eave, angle it down more steeply and accept it’s an overview camera — then add an identify camera lower down somewhere else.
Step 7 — Check what falls outside your boundary
Stand at the mount point and look along the intended angle. Are you capturing your neighbour’s front windows? The footpath? A big chunk of public road?
Under the Privacy Act 2020, filming beyond your own property brings obligations, and the Office of the Privacy Commissioner has specific guidance for home CCTV. A narrower lens or a tighter angle often solves this for you — one of the quiet advantages of choosing 4mm or 6mm over 2.8mm on a boundary-facing camera.
Step 8 — Plan for night
Check the model’s IR range against your measured distance. If the camera needs to identify someone at 10 metres at night, a short-range IR won’t do it regardless of lens. Consider a low-light colour camera or adding a sensor light.
Step 9 — Test before you drill
Temporarily mount or hold the camera in position, connect it, and look at the live view on your phone. Have someone stand at the money spot. Can you identify them? Adjust, then fix it permanently.
Ten minutes of testing beats a permanently mounted camera pointing at the wrong thing.
Common Mistakes to Avoid
1. Fitting 2.8mm cameras everywhere. It’s the default, it’s cheap, and it feels safe because it “sees more”. It sees more of nothing. Cameras covering a driveway or gate need a longer lens.
2. Mounting too high. Under the second-storey eave feels tidy and vandal-proof. It also guarantees you’ll never see a face. 2.5–3 metres.
3. Trusting the “sees 40 metres” claim. That’s Detect. Identify is a fraction of it.
4. Expecting to zoom in later. Digital zoom on recorded footage just enlarges the pixels you already captured. If the detail wasn’t recorded, it doesn’t exist. Get the lens right at install time.
5. Ignoring where the sun goes. A west-facing camera at 6pm in a Kiwi summer stares directly into low sun and washes out completely. Check the angle at the times of day that matter.
6. Forgetting the coast. If you’re anywhere near salt spray — most of New Zealand — a marine-grade housing and a high IP rating matter as much as the lens. Salt film on the glass ruins image quality faster than any spec sheet suggests.
7. Aiming a wide lens along a long driveway. The intruder becomes a 20-pixel smudge in the distance while the lens wastes half the frame on the hedge. Long and narrow needs a long lens.
8. Not covering the recording gear. Plenty of NZ burglaries end with the NVR being taken. Put a camera on the room it lives in, or use cloud or off-site backup.
9. Filming the neighbours by accident. Neighbour disputes and privacy complaints are avoidable with a tighter lens and a thoughtful angle.
10. Buying the kit before planning the property. The five-camera bundle is only good value if all five lenses suit your five positions. Plan first, buy second.
Frequently Asked Questions
What’s the difference between 2.8mm and 4mm security cameras?
A 2.8mm lens sees roughly 100–110° wide; a 4mm sees roughly 80–90°. The 2.8mm covers more area but makes people look smaller, so face detail fades past about 5 metres. The 4mm gives up some width in exchange for usable identification out to around 8 metres. For doorways choose 2.8mm; for driveways and yards choose 4mm.
Which security camera lens is best for a driveway in New Zealand?
For a standard suburban driveway of 8–15 metres, a 4mm lens mounted at the front corner of the house at about 2.8 metres is the strongest all-round choice. For long rural or shared driveways over 20 metres, a 6mm or a varifocal camera will give far better detail at the gate end.
Is a 6mm lens too zoomed in for a home?
Not for the right position. A 6mm is a poor choice at a front door, but excellent looking down a long drive, along a fence line, or at a shed 15–20 metres away. Most homes benefit from having one narrow lens alongside their wider ones.
Does the lens affect night vision?
Yes. Infrared light gets spread across whatever area the lens is covering, so a wide 2.8mm lens has shorter effective night reach than a 6mm looking down a narrow corridor. If night performance at distance matters, a longer lens usually helps.
Can I just zoom in on the footage instead of buying a longer lens?
No. Digital zoom only enlarges pixels that were already recorded — it can’t create detail that was never captured. Optical reach comes from the lens and the resolution. Choose correctly before installation.
What lens should a small business or dairy use?
Use 2.8mm above the counter and till area where everything happens within a few metres, and 4mm covering the shop floor and entrance. If you have a carpark or a rear loading area, add a 6mm. Retail identification usually needs a camera close to and slightly above head height at the counter.
How high should I mount a security camera?
Between 2.5 and 3 metres for any camera meant to identify faces — out of reach but still looking at people rather than down at the tops of heads. Overview cameras can go higher, but accept that identification will suffer.
Is a varifocal camera worth the extra money?
For one or two awkward positions, yes. Being able to fine-tune the zoom during installation — or later from your phone with a motorised model — removes the guesswork and often costs less than replacing a wrong fixed lens.
Does lens choice affect my privacy obligations in NZ?
It can help. Under the Privacy Act 2020, capturing footage beyond your own property brings responsibilities, and the Office of the Privacy Commissioner publishes guidance for home and business CCTV. A narrower lens naturally captures less of the street and neighbouring properties, which reduces the issue at the source.
What lens do I need for a farm gate 40 metres from the house?
At 40 metres, no standard fixed lens will identify a face reliably. Options are: put a 6mm camera much closer to the gate itself, use a varifocal or zoom camera at the higher end of its range, or run a 4K camera and accept vehicle and clothing identification rather than facial detail. Two cameras — one wide at the house, one narrow at the gate — is the practical rural answer.
Final Recommendation
The best lens isn’t a single lens. It’s the right lens for each spot on your property, and that comes down to one measurement: how far away is the place where you’d need to recognise a face?
If you’re starting from scratch on a standard New Zealand home, this combination covers most situations well:
- Front door / back door: 2.8mm — wide, close, full context
- Driveway / side path / main yard: 4mm — the reliable all-rounder
- Long approach, gate, shed, or fence line: 6mm — reach and real detail
- The one awkward position you’re unsure about: varifocal — stop guessing
Businesses should follow the same logic, just weighted towards the till, the entrance and the stock area. Lifestyle block and farm owners should lean harder on 6mm and varifocal, because rural distances break wide lenses.
The point of this security camera lens guide NZ is to save you the experience described at the top of this article — footage that proves something happened but can’t tell you who did it. Measure the distances, match the lens, mount at head height, and test before you drill. That’s the whole job.
Ready to Choose the Right Lens?
Browse our full range of 2.8mm, 4mm, 6mm and varifocal security cameras, with New Zealand stock, local warranty and NZ-based support.
Shop security cameras at ANNKE NZ →
Still not sure which lens suits your driveway, gate or shop counter? Send us a rough sketch of your property with the distances marked and we’ll tell you exactly which lenses to put where — before you spend a cent.
Appendix: Implementation Notes
Image Alt Text Suggestions
| Placement | Alt Text |
|---|---|
| Hero image | Security camera lens guide NZ comparing 2.8mm, 4mm and 6mm CCTV lenses |
| Diagram — viewing angles | CCTV viewing angle diagram showing 2.8mm, 4mm and 6mm coverage side by side |
| Coverage graphic | Coverage width comparison of 2.8mm vs 4mm security camera lenses at 10 metres |
| 2.8mm section | Wide-angle security camera covering a New Zealand front door and letterbox |
| 4mm section | Outdoor security camera lens covering a suburban NZ driveway and garage |
| 6mm section | 4mm vs 6mm CCTV lens comparison on a long rural driveway in New Zealand |
| DORI graphic | DORI chart showing detect, observe, recognise and identify distances for CCTV |
| Mounting height image | Correct security camera mounting height of 2.5 to 3 metres on a NZ home |
| Comparison table image | Best security camera lens for home NZ comparison chart |
| CTA image | ANNKE NZ security camera range with 2.8mm, 4mm and 6mm lens options |
Internal Linking Opportunities
Confirmed target:
https://annke.co.nz/shop/— anchor: “security cameras at ANNKE NZ” (CTA) and “browse cameras by lens size” (after the comparison table)
Suggested additional targets (link if these pages exist on the site; create them if not — each is a strong supporting cluster page):
- Product category pages for bullet, turret/dome and PTZ cameras — link from the relevant option sections
- A guide to IP ratings and weatherproofing — link from the “forgetting the coast” mistake
- A camera resolution guide (2MP vs 4MP vs 8MP) — link from Step 5 of the how-to-choose section
- An NVR and storage guide — link from the “not covering the recording gear” mistake
- A night vision / low-light camera guide — link from the night vision concept section
- A CCTV privacy and legal guide for NZ — link from Step 7 and the privacy FAQ
- A DIY installation guide — link from Step 9 (test before you drill)
- Varifocal camera collection page — link from the bonus option section
External Authority Sources
| Source | Use |
|---|---|
| CCTV Importers — 2.8mm vs 4mm lens comparison (supplied link) | Supporting reference in the 2.8mm vs 4mm section |
| IEC / EN 62676-4 video surveillance standard (iec.ch) | Cite as the origin of the DORI classification |
| Office of the Privacy Commissioner NZ (privacy.org.nz) | Cite in Step 7 and the privacy FAQ — link to their current CCTV guidance page |
| New Zealand Police crime prevention advice (police.govt.nz) | Cite in the common mistakes and risk-mapping sections |
| Consumer NZ home security guidance (consumer.org.nz) | Optional trust signal in the final recommendation |
Verify each URL is live before publishing and link to the specific current guidance page rather than the site root where possible.
FAQ Schema — Question Set (FAQPage ready)
- What’s the difference between 2.8mm and 4mm security cameras?
- Which security camera lens is best for a driveway in New Zealand?
- Is a 6mm lens too zoomed in for a home?
- Does the lens affect night vision?
- Can I just zoom in on the footage instead of buying a longer lens?
- What lens should a small business or dairy use?
- How high should I mount a security camera?
- Is a varifocal camera worth the extra money?
- Does lens choice affect my privacy obligations in NZ?
- What lens do I need for a farm gate 40 metres from the house?
Keyword Placement Audit
| Keyword | Placements |
|---|---|
| Security camera lens guide NZ (primary) | SEO title, meta description, slug, H1, intro (within first 100 words), conclusion, CTA section |
| 2.8mm vs 4mm security camera | Short answer, key concepts, comparison table, FAQ 1 |
| 4mm vs 6mm CCTV lens | Option 3 heading area, comparison table, image alt text |
| Best security camera lens for home NZ | Final recommendation, image alt text |
| CCTV viewing angle | H3 in Key Concepts, comparison table, DORI section |
| Outdoor security camera lens | Night vision section, Option 3, image alt text |
 No products in the cart.