
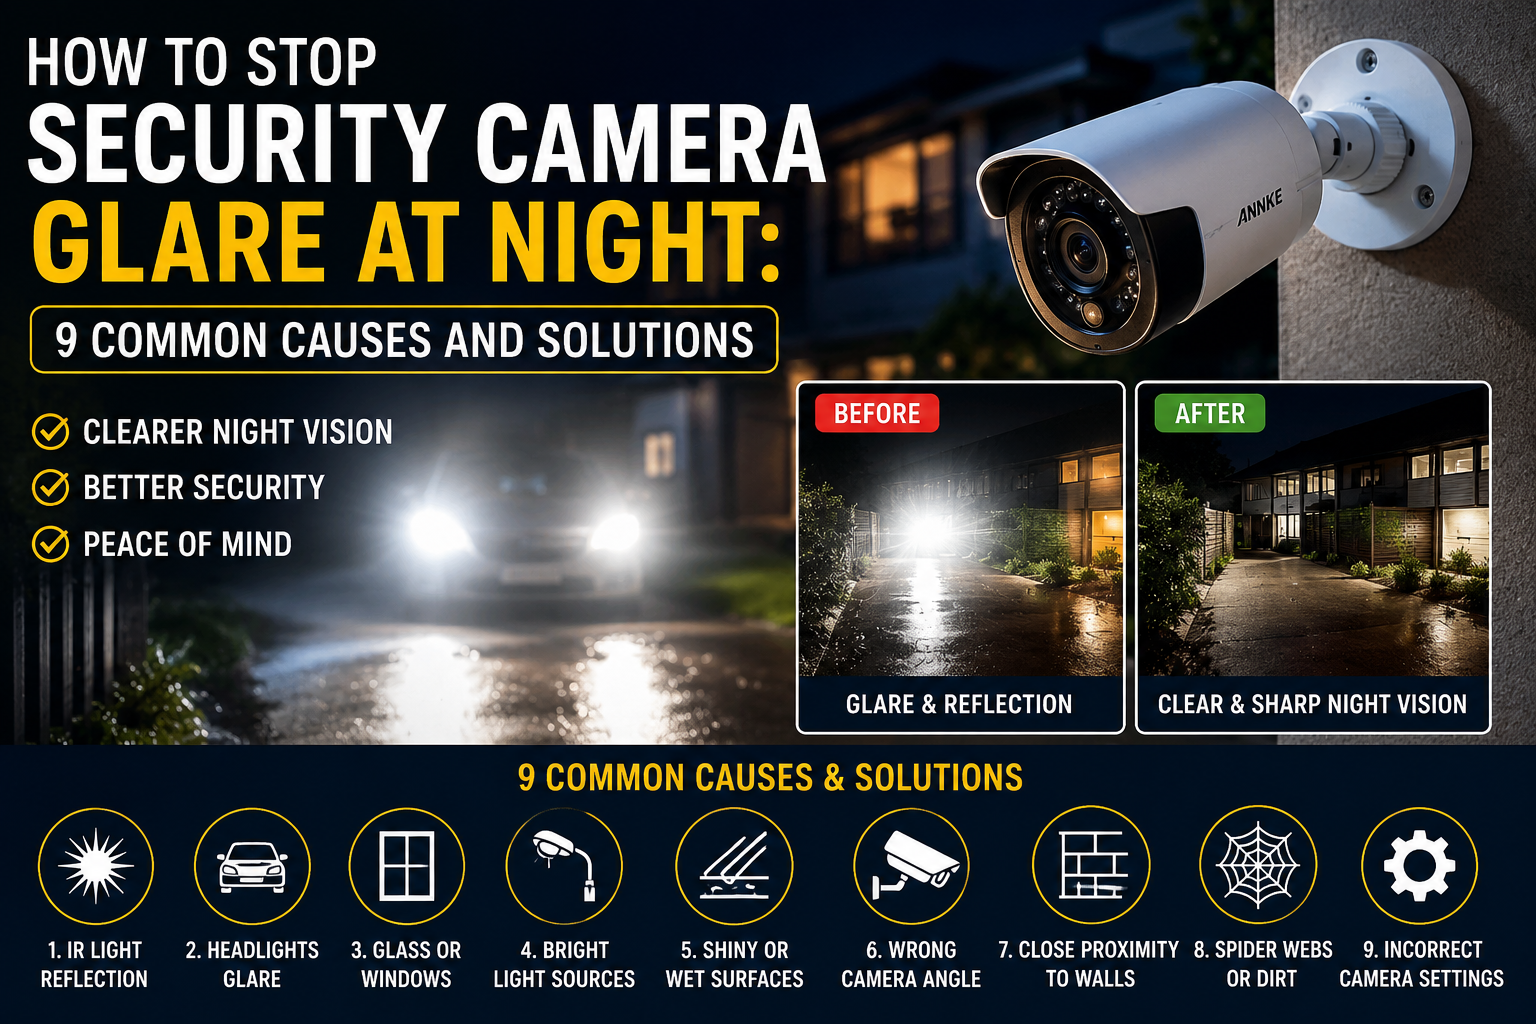
You check the camera feed one wet Auckland night, expecting to see the driveway. Instead, you get a wall of white haze, a floating orb near the porch, and headlights blooming across the lens. The gate is somewhere in that mess, but you can’t tell if anyone is standing at it.
This is one of the most common problems Kiwi homeowners face with outdoor CCTV. Bright IR bounce, wet windows, or a light in the wrong spot can turn a great camera into a foggy mess after dark. The good news is that most causes are easy to fix once you know what to look for.
In this guide, we’ll walk through the nine most common reasons your security camera glare at night looks so bad, share simple fixes for each, and help you choose the right setup for your NZ home or small business.
Short Answer
Security camera glare at night usually happens when infrared (IR) light from the camera reflects off something close by, such as a wall, glass, spider web, or rainwater. To fix it, clean the lens, move the camera away from reflective surfaces, angle it slightly downward, add a lens hood, and consider upgrading to a camera with a smart IR or full‑colour night vision sensor.
That’s the short version. Now let’s dig into why it’s happening on your property and what to do about it.
What Is Security Camera Glare at Night?
Security camera glare at night is the halo, streak, or milky white haze that appears in your CCTV footage after sunset. It shows up as a bright spot near the centre of the image, a foggy overlay across the whole scene, or a “starburst” around streetlights and porch bulbs.
Most of the time, glare is not a fault with the camera itself. It’s the way the camera’s built‑in infrared LEDs interact with the world around it. Once you understand that, the fixes become straightforward.
Think of it like driving through fog with your high beams on. The light hits the water droplets in the air and bounces back at you. Your CCTV does the same thing with rain, dust, walls, and glass.
Key Concepts Explained
Before we get into the causes, it helps to know a few basics. These come up again and again when Kiwi property owners troubleshoot CCTV camera glare at night.
Infrared (IR) LEDs. Most outdoor cameras have small IR lights around the lens. Your eyes can’t see them, but the camera sensor can. They light up the scene when it gets dark.
IR bloom. When those IR lights bounce off a nearby surface, the sensor gets flooded. The image goes white or washed out. This is the most common cause of glare in NZ homes.
Reflection. Any smooth surface can reflect IR light back into the lens. Windows, painted walls, wet concrete, aluminium joinery, and even glossy weatherboards are all common culprits.
Backscatter. Small particles like rain, mist, spider webs, and dust catch the IR light and throw it back at the lens. On a damp Wellington evening, this can make the whole picture look milky.
Starlight and ColorVu sensors. Newer cameras use very sensitive sensors that can capture usable images with almost no light. They rely less on IR, so they suffer less from bloom and reflection.
Once you know these terms, the nine causes below will make a lot more sense.
The 9 Common Causes of Night‑Time CCTV Glare
Here’s the shortlist of what’s usually going wrong. We’ll cover the deeper fixes in the option sections after this.
- Dirty or smudged lens – dust, pollen, salt spray, and fingerprints scatter IR light straight back at the sensor.
- Spider webs across the housing – a classic Kiwi problem, especially in summer. Webs glow like white sheets on IR.
- Rain, mist, or fog – water droplets act like tiny mirrors and cause backscatter.
- Reflective surfaces too close – walls, garage doors, fences, and windows within a metre of the lens reflect IR back.
- Camera pointed at glass – shooting through a window or at a glass door creates a ghost image and heavy bloom.
- Poor camera angle – mounting the camera flat against a wall lets IR skim the surface and light it up.
- Nearby light sources – a porch bulb, sensor light, or streetlamp aimed toward the lens creates flare and hotspots.
- Weak or overpowered IR LEDs – budget cameras often blast too much IR for short distances, which causes overexposure.
- Old or low‑quality sensor – older cameras can’t balance bright and dark areas well, so any light source turns into glare.
If one of these sounds familiar, keep reading. The next three sections cover the three main ways to solve security camera night vision problems and get a clean picture again.
Option 1: Optical and Placement Fixes (DIY)
This is the first thing to try. It costs nothing or next to nothing, and it fixes maybe seven out of ten glare problems on its own.
The idea is simple. You clean the lens, move the camera, and change the angle so IR light stops bouncing back at the sensor.
Who it’s for: Homeowners and renters who already have a camera installed and want a quick weekend fix without buying new gear.
Pros:
- Free or very cheap.
- Works with any brand of camera.
- You can test each change straight away in the app.
- No electrician needed.
Cons:
- Won’t fix a truly weak sensor or bad camera.
- Some houses just don’t have a glare‑free mounting spot.
- Heavy rain and fog can still cause backscatter.
NZ use case: A Christchurch homeowner had a bullet camera mounted under the eaves, angled down at the driveway. Every night the top half of the image was pure white. The fix was three small steps: wipe the lens with a microfibre cloth, tilt the camera down another 10 degrees, and stick a small foam ring around the lens to stop IR light hitting the housing. Total cost was zero, and the footage went from useless to clear.
If you want to try this route, work through the list in order:
- Clean the lens gently with a microfibre cloth and a drop of lens cleaner.
- Check the housing for spider webs and wipe them off.
- Point the camera slightly downward, not flat against the wall.
- Move it at least 30–50 cm away from walls, gutters, and windows.
- Never shoot through glass. Drill through the wall or use an external cable gland instead.
- Add a small lens hood or sun shield if bright lights are nearby.
If glare is still there after this, move on to Option 2.
Option 2: Lighting Upgrades and External IR
Sometimes the camera itself is fine, but the lighting around it is working against you. Adding the right kind of light, or replacing the IR source, can transform your night footage.
The trick is that “more light” is not always the answer. It’s about the right light in the right place.
Who it’s for: Property owners who already have decent cameras but keep getting CCTV blurry at night or washed‑out faces at the gate.
Pros:
- Cheap to moderate cost, depending on the kit.
- Great for large driveways, back yards, and commercial car parks.
- Warm white light can also deter intruders.
- Lets you use a lower IR setting on the camera, which reduces bloom.
Cons:
- Adds another device to install and power.
- Motion‑activated lights can spook cameras and create false triggers.
- White light may bother neighbours if aimed poorly (worth checking your local council rules).
NZ use case: A small dairy in Hamilton had constant glare from the shopfront window at night. The IR was bouncing off the glass and creating a huge white patch that hid the till area. Instead of moving the camera, the owner added a low‑wattage warm white LED strip inside the shop, then turned the camera’s IR down to its lowest setting. The glare disappeared and the footage picked up faces clearly at the counter.
Here are the main lighting‑based fixes to try:
- Add a low ambient light. A soft porch light or a garden LED gives the camera enough light to switch out of IR mode.
- Install an external IR illuminator. A separate IR light placed a few metres from the camera lights the scene without blasting the lens.
- Replace old halogen bulbs with modern LEDs. Halogens create harsh hotspots. LEDs spread light more evenly.
- Angle any motion lights away from the lens. They should light the area, not the camera.
- Turn down the camera’s IR strength in the app if that setting is available.
If you’ve tried optics and lighting and still get glare on rainy nights, the sensor itself is likely the limit. That’s when you look at Option 3.
Option 3: Upgrade to a Modern Low‑Light or Full‑Colour Camera
Camera tech has moved on a lot in the last few years. If your CCTV is more than five or six years old, or came in a bargain kit, an upgrade may fix your night vision camera glare for good.
Modern cameras use larger sensors, wider apertures, and smarter processing. Many can capture a full‑colour picture in near darkness without needing IR at all.
Who it’s for: Homeowners and small business owners who want a long‑term fix, better face and number‑plate detail, and less fiddling with settings.
Pros:
- Colour night vision makes footage far more useful for identifying people and vehicles.
- Smart IR adjusts brightness automatically to reduce bloom.
- Better dynamic range handles porch lights and streetlamps without flare.
- Higher resolution catches more detail at distance.
Cons:
- Higher upfront cost.
- May need a compatible recorder (NVR) or app.
- Older cabling may need replacing for PoE models.
NZ use case: A Wellington property manager looked after a set of four townhouses with older 1080p bullet cameras. Every night the shared driveway looked like a foggy blur, and tenants couldn’t tell who was coming and going. They swapped to 4MP full‑colour night vision cameras with warm‑light LEDs built in. The driveway now shows in colour after dark, faces are clear at the gate, and glare from wet paving is gone.
Common features to look for when upgrading:
- Starlight or ColorVu‑style sensor for low‑light colour.
- Smart IR that adjusts brightness based on distance.
- True WDR (Wide Dynamic Range) to handle bright and dark areas at once.
- Warm white LED array for full‑colour footage after dark.
- IP66 or IP67 rating for NZ weather.
- Local storage plus cloud backup so you never lose footage.
Have a look at the full range of Annke NZ security cameras if you want to see what a modern setup looks like.
Side‑by‑Side Comparison
Here’s a quick comparison of the three options so you can see which one fits your situation.
| Feature | Option 1: DIY Optical Fixes | Option 2: Lighting Upgrades | Option 3: New Low‑Light Camera |
|---|---|---|---|
| Typical cost (NZD) | $0–$30 | $40–$300 | $200–$800+ per camera |
| Time to set up | 15–30 minutes | 1–2 hours | Half a day |
| Skill level | Easy | Easy to medium | Medium (or hire installer) |
| Fixes IR bloom? | Often | Yes, if paired with lower IR | Yes, built in |
| Fixes reflection off glass? | Yes, if repositioned | Partly | Yes |
| Fixes rain and mist backscatter? | Rarely | Sometimes | Often |
| Gives colour night footage? | No | Only with white light | Yes |
| Best for | Quick wins on existing gear | Larger areas, driveways, shops | Long‑term clear night footage |
| Ongoing effort | Occasional cleaning | Bulb replacement | Very low |
If you’re on a tight budget, start with Option 1 tonight. If you have a bit to spend and want a real improvement, combine Options 2 and 3.
How to Choose the Right Fix (Step by Step)
Not sure where to start? Follow this simple path.
Step 1: Look at your current footage. Turn your camera on tonight and take a screenshot. Is the glare a bright ring in the centre, a general fog, or a hotspot from a nearby light? The pattern points to the cause.
Step 2: Check the easy stuff first. Clean the lens, clear away webs, and tilt the camera a bit further down. This alone solves a huge share of how to fix CCTV glare questions we see from Kiwi customers.
Step 3: Check your surroundings. Stand where the camera is mounted and look at what’s within a metre. Any wall, gutter, window, or shiny surface is a suspect. Reposition if you can.
Step 4: Rethink your lighting. If there’s a bare bulb or motion light aimed near the lens, redirect it. If the area is pitch black, add a small warm light so the camera doesn’t have to rely so heavily on IR.
Step 5: Test in real conditions. Wait for a wet night. That’s when weak setups fail hardest. If glare returns in the rain, the sensor is likely the limit.
Step 6: Upgrade if needed. If your camera is old, low resolution, or lacks smart IR, this is when a new model pays for itself. Look for full‑colour night vision and true WDR.
Step 7: Get advice for tricky spots. Long driveways, rural lifestyle blocks, and shopfronts with big windows sometimes need a custom setup. A quick chat with a local installer or the Annke NZ team can save hours of trial and error.
Work through these steps in order. Most people find their fix by Step 4.
Common Mistakes to Avoid
Even careful DIYers slip up here. These are the mistakes that cost people the most time and money.
Mounting the camera flat against a wall. IR light skims the surface and lights up the whole wall. Always tilt slightly outward and downward.
Filming through a window. Even clean glass reflects a huge amount of IR back at the lens. Drill through the wall instead, or use a camera designed for indoor‑to‑outdoor viewing.
Cranking IR to maximum. More IR is not always better. On close subjects, it overexposes faces and creates ghostly white blobs. Turn it down.
Ignoring spider webs. In an NZ summer, webs form overnight. Check the housing weekly, especially in rural and semi‑rural properties.
Buying the cheapest kit online. Ultra‑cheap cameras often have small sensors and weak processors. They struggle with any bright light and produce constant glare. Pay a little more for a known brand with local support.
Skipping the app settings. Most modern cameras have image controls you never see because the app opens on the live view. Dig into settings for IR strength, WDR, and shutter speed. Small changes make a big difference.
Forgetting about weather. NZ has a lot of coastal salt spray, damp mornings, and windy dust. Pick cameras rated at least IP66, and expect to wipe them down every few months.
Avoid these and you’ll be ahead of most home installers.
Frequently Asked Questions
Q1: Why does my security camera glare at night but look fine during the day?
Because during the day your camera uses natural light. At night, it switches to infrared LEDs mounted next to the lens. Any surface, particle, or light source close by can reflect that IR straight back and cause glare. Daytime footage doesn’t have that problem because IR is off.
Q2: How do I stop CCTV glare through a window?
The best fix is to not shoot through glass at all. Move the camera outside and run the cable through the wall. If that’s not possible, turn off the IR LEDs in the app and place a small light on the outside of the glass so the camera can use visible light instead.
Q3: Will a lens hood or shroud really help?
Yes, especially if you have a nearby light source causing flare. A small hood blocks stray light from hitting the lens at an angle. Some cameras include one; for others, you can buy or 3D‑print a simple shroud for a few dollars.
Q4: My CCTV is blurry at night even without glare. What’s wrong?
That’s usually a focus, resolution, or shutter issue, not glare. Check that the lens is clean and in focus. If your camera has manual focus, adjust it at night, not during the day. If the image is dark and grainy, the sensor may be too small for the scene, and an upgrade is worth considering.
Q5: Do all outdoor cameras suffer from IR bloom?
Most cameras with built‑in IR can bloom in the wrong conditions. Cameras with “smart IR” adjust the brightness based on distance and reduce the problem a lot. Full‑colour night vision cameras skip IR entirely in many scenes and rarely bloom at all.
Q6: Is colour night vision better than infrared?
For identifying people, vehicles, and clothing, yes. Colour night vision gives you a natural picture that’s much easier to use as evidence. Traditional IR is still useful in pitch‑black areas where you don’t want any visible light, such as remote sheds or rural boundaries.
Q7: Can rain and fog cause security camera glare at night?
Yes. Water droplets scatter IR light and create a milky haze called backscatter. There’s no perfect fix, but tilting the camera down, adding a lens hood, and using a full‑colour night camera with white light all help.
Q8: How often should I clean my outdoor CCTV cameras?
For most NZ homes, every two to three months is enough. Coastal properties near the sea should aim for monthly. Rural and lifestyle blocks may need extra checks in spring and summer when spider webs and pollen are worst.
Q9: Do I need a professional installer to fix camera glare?
Not for most homes. The steps in this guide are DIY‑friendly. If you have a large property, long cable runs, or a commercial site, a local installer can save you time and make sure the layout is right the first time.
Q10: How much should I spend on a good night‑vision camera in NZ?
A quality single camera with full‑colour night vision usually starts around NZD $200–$400. A four‑camera home kit sits in the $700–$1,500 range. Cheaper is possible, but the sensors and IR quality usually show it after dark.
Final Recommendation
If you’re dealing with security camera glare at night, don’t jump straight to buying new gear. Nine times out of ten, a quick lens clean, a small angle change, and a rethink of nearby lighting will clear up the footage. Work through the DIY fixes first, then look at lighting, and only upgrade the camera if the sensor is genuinely the limit.
For most NZ homeowners, the sweet spot is a modern full‑colour night vision camera paired with a soft ambient light. You’ll get clear footage on wet nights, better faces at the gate, and far fewer false alerts. Small businesses in NZ towns benefit even more, because clear night footage protects your stock, your staff, and your insurance claims.
Getting your night‑time CCTV right doesn’t need to be complicated. It just needs the right camera in the right spot, with the right light around it.
Ready to See Clearly at Night?
Have a look at the full range of night‑vision security cameras at Annke NZ. You’ll find IP‑rated outdoor models with full‑colour night vision, smart IR, and true WDR — all built to handle NZ weather, from Kaitaia to Invercargill.
If you’re not sure which model fits your driveway, shopfront, or lifestyle block, get in touch with the Annke NZ team. A quick chat now saves a season of blurry, glare‑filled footage later.


 No products in the cart.