
You come home to Papatoetoe after a long weekend down at the bach, only to find your side gate wide open and a courier parcel missing from the porch. Nothing major, no broken windows, but that uneasy feeling stays with you for weeks. If this sounds familiar, you’re not alone. Property crime is still one of the top worries for Kiwi households, and most of us are asking the same question: how many security cameras do I need to actually feel safe at home?
The honest answer is that there’s no single magic number. It depends on the size of your section, whether you have a driveway, a back deck, side access, and how much you can realistically monitor. This guide breaks it down in plain English, so you can plan a security camera system NZ homes actually benefit from, not one that leaves blind spots or blows the budget.
Short Answer: How Many Security Cameras Do You Need?
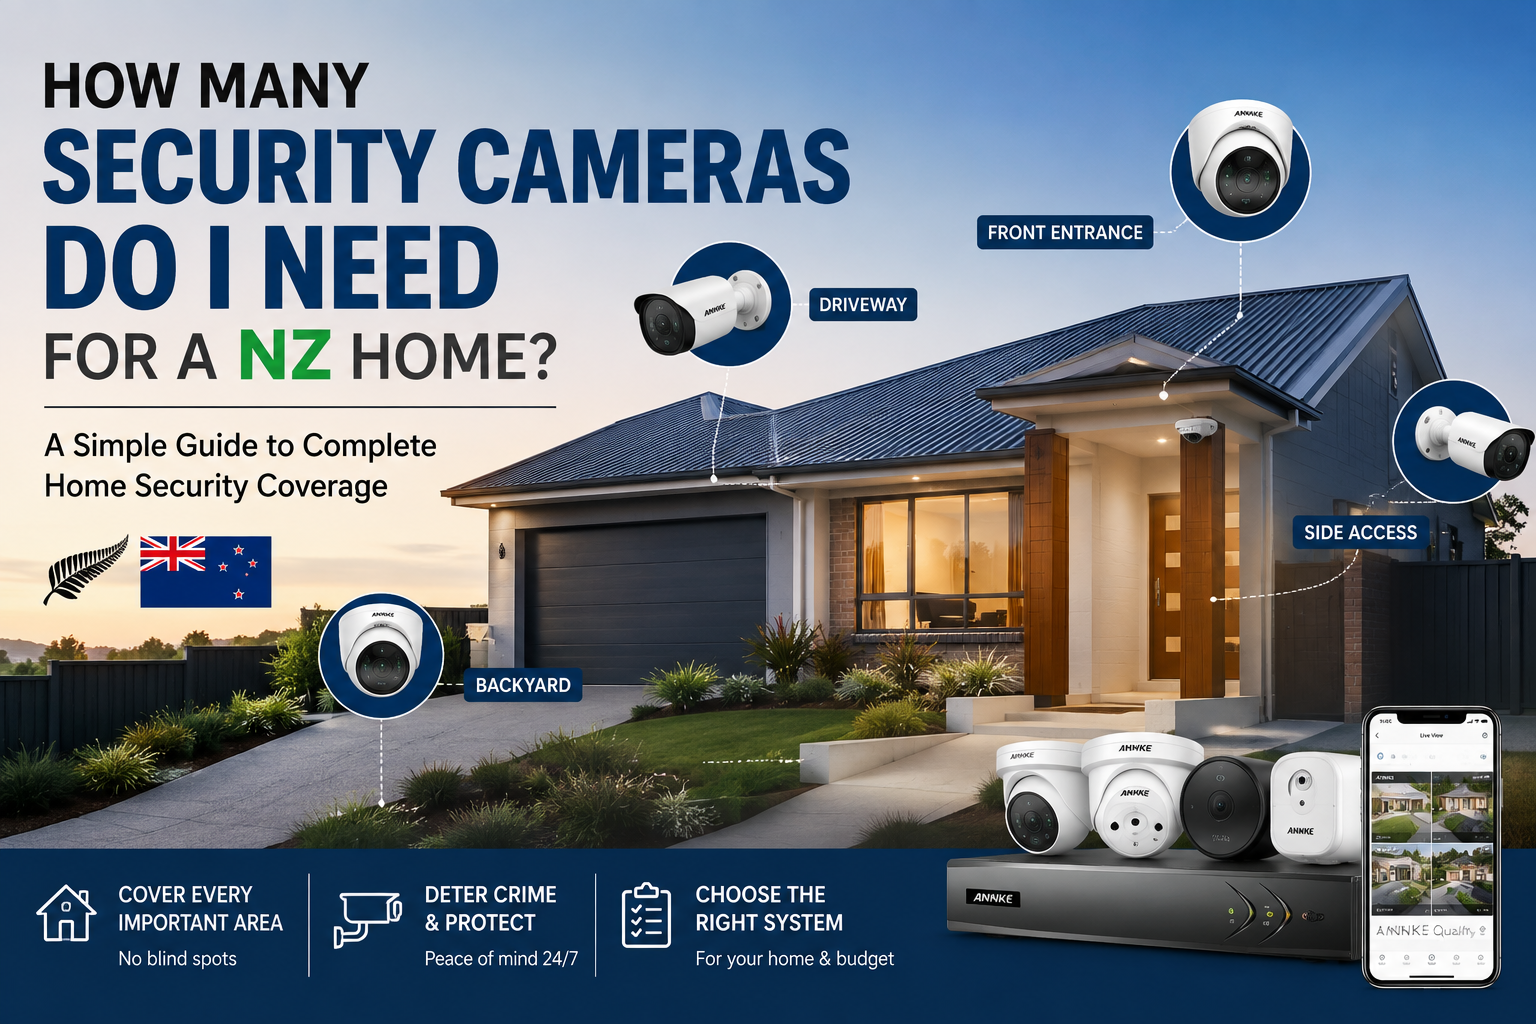
Most standard New Zealand homes need between 4 and 6 security cameras for full coverage. A small townhouse or apartment can often get away with 2 to 3, while a larger lifestyle block or a two-storey home with a big backyard may need 6 to 8 or more. The goal isn’t to cover every square metre. It’s to cover every entry point, every driveway, and any dark corner someone could slip through unnoticed.
Here’s the quick rule of thumb Kiwi installers use: one camera per entry point, plus one for the driveway and one for the backyard. Everything else is a nice-to-have.
What Are Home Security Cameras, Really?
Home security cameras are small networked devices that record video of your property and either save it to a hard drive, a memory card, or the cloud. Modern ones do a lot more than just film. Many detect motion, send alerts to your phone, talk back through a speaker, and even tell the difference between a person, a car, and your neighbour’s cat wandering across the lawn.
For most Kiwi households, cameras fall into two broad camps. There are wired CCTV systems that connect to a recorder (NVR or DVR) and store footage locally. Then there are wireless or Wi-Fi cameras that stream to an app and often use cloud storage. Both can be brilliant. The right pick depends on your property and how hands-on you want to be.
Key takeaway: A good camera setup is about coverage, not count. Two well-placed cameras will beat six badly angled ones every day of the week.
Key Concepts to Understand Before You Buy
Before we get into numbers, there are a few things worth knowing. These make the rest of the article far easier to follow, and they’ll save you money when you’re comparing gear.
Field of View (FoV)
This is how wide a camera can see, measured in degrees. A narrow lens might cover 60°, while a wide-angle unit covers 110° or more. Wider isn’t always better because the image gets distorted at the edges. For driveways and backyards, 90° to 110° is usually the sweet spot.
Resolution
Measured in megapixels or in terms like 1080p, 2K, 4K, and 8MP. Higher resolution means you can zoom in on a number plate or face without the image turning into mush. For most NZ homes, 2K or 4MP is plenty. 4K is great if you want to identify people from further away.
Storage Type
You can save footage to an SD card in the camera, a network video recorder (NVR) inside the house, or the cloud. Local storage keeps your data private and works even if the internet drops out. Cloud is handy for viewing on the go but usually costs a monthly fee.
Coverage vs Overlap
CCTV camera coverage isn’t just about angles. Good systems overlap slightly, so if someone walks out of one camera’s view, another picks them up. Blind spots between cameras are where thieves get comfortable.
Option 1: Small Home or Apartment Setup (2 to 3 Cameras)
This suits most townhouses, units, and one-bedroom rentals where you’ve got a single entry and maybe a small courtyard.
Who it’s for: Renters, apartment dwellers, first-home buyers in compact townhouses, and anyone with a small footprint who wants basic peace of mind.
Pros:
- Affordable to set up, often under $600 for decent gear
- Quick to install, especially with wireless cameras
- Easy to monitor with just a phone app
- Landlords often allow small wireless setups without drilling
Cons:
- Limited coverage if your property has multiple access points
- Wireless cameras rely on Wi-Fi, which can drop out
- Cloud storage plans can add up over time
NZ Use Case: Sarah rents a two-bedroom unit in Newtown, Wellington. She’s got one front door, one back slider, and a shared courtyard. Two cameras (one facing the front path, one covering the back door) plus a doorbell cam give her full visibility. Total spend was around $550, and she can pack it up when she moves.
Option 2: Standard Family Home Setup (4 to 6 Cameras)
This is the sweet spot for the vast majority of New Zealand homes. Think three-bedroom houses in the suburbs, standalone dwellings on a full section, or older villas in Ponsonby, Merivale, or St Clair.
Who it’s for: Families, homeowners on quarter-acre sections, and anyone with a driveway, a garage, and a decent-sized backyard.
Pros:
- Covers all standard entry points with room to spare
- Balances cost and thoroughness
- Handles both front-of-house and back-of-house monitoring
- Enough cameras to overlap coverage and remove blind spots
Cons:
- Usually needs a proper NVR setup and some cable runs
- Better done by a professional if you want it tidy
- More cameras means more time reviewing footage
NZ Use Case: The Patel family in Manurewa has a standard 600m² section, a double garage, and a back deck. They installed five cameras: one on the front porch, one covering the driveway, one over the garage door, one on the back deck, and one watching the side path where the rubbish bins live. The side path camera was the winner. It caught someone trying the laundry window six months in.
Option 3: Large Home or Lifestyle Block Setup (6 to 10+ Cameras)
For big properties, multi-level homes, or rural blocks where you’ve got long driveways, sheds, and multiple outbuildings.
Who it’s for: Owners of lifestyle blocks, farms, two-storey homes with wraparound decks, holiday homes, and small businesses run from a residential address.
Pros:
- Full-perimeter coverage with no gaps
- Can protect vehicles, boats, tools, and outbuildings
- Motion-triggered floodlight cams handle dark driveways
- Multiple viewpoints mean you catch every angle
Cons:
- Higher upfront cost, often $2,500 to $6,000+
- Almost always needs professional installation
- More storage required, so budget for a bigger NVR
- Wiring can be a real job on older or spread-out properties
NZ Use Case: A lifestyle block owner near Cambridge has the main house, a shed for the ride-on mower and tools, a carport, and a long gravel driveway from the road. Eight cameras cover it: front gate, driveway midway, front door, back deck, shed, carport, side of house, and one facing the paddock where the trailer lives. They caught two people scoping out the shed at 2am last winter. Police used the footage.
Side-by-Side Comparison of Home Security Camera Setups
| Setup Type | Property Size | Cameras Needed | Typical Cost (NZD) | Storage | Best For |
|---|---|---|---|---|---|
| Small | Under 100m² | 2 to 3 | $400 – $900 | SD card or cloud | Renters, apartments |
| Standard | 100 – 300m² | 4 to 6 | $1,200 – $2,500 | NVR + hard drive | Family homes |
| Large | Over 300m² or rural | 6 to 10+ | $2,500 – $6,000+ | NVR with 2TB+ | Lifestyle blocks, big sections |
| Business at home | Mixed | 6 to 12 | $3,000 – $8,000 | NVR + backup cloud | Home-based businesses |
How to Choose the Right Number of Cameras: A Step-by-Step Approach
Rather than guessing, walk through this simple process. It’s what a good installer will do when they visit your place.
Step 1: Map Every Entry Point
Start with a rough sketch of your property. Mark every door, window, gate, and any way someone could physically get onto your section. This includes side gates, back fences with easy access, garage doors, and any windows on the ground floor. Aim for one camera per entry point that isn’t clearly visible from another camera.
Step 2: Identify High-Value Zones
Where do you park the car? Where’s the boat or trailer stored? Where do the rubbish bins and outdoor gear live? These are prime targets. Each high-value zone deserves its own camera or clear coverage from an existing one.
Step 3: Check for Blind Spots
Walk your property at dusk. Look for spots where you’d hide if you were up to no good. Behind the shed, down the side of the garage, along the back fence line. These are the blind spots you need to close.
Step 4: Factor in Lighting
A camera pointed at a pitch-black driveway isn’t much use. Either add motion-activated lights, choose cameras with strong infrared or full-colour night vision, or opt for models with built-in spotlights. Home security camera placement NZ homeowners regret most often comes down to poor lighting, not poor gear.
Step 5: Match Your Budget to Priorities
You don’t have to buy the whole system at once. Start with the front door, driveway, and one back-of-house camera. Add the side path and garage next. Then fill in the blind spots. Prioritise areas where an incident would hurt most.
Step 6: Decide on Wired vs Wireless
Wired systems are more reliable, harder to disable, and better for larger setups. Wireless suits renters, small properties, and anyone who wants a quick DIY job. Some brands like Annke offer both, so you can mix and match.
Common Mistakes Kiwi Homeowners Make with Security Cameras
Even experienced buyers slip up on these. Avoid them and your system will be worth every dollar.
Mistake 1: Buying Too Many Cameras Too Soon
More isn’t always better. Six cameras poorly placed will miss more than three well-placed ones. Plan the coverage first, then buy.
Mistake 2: Ignoring the Side of the House
Front and back are obvious. The side path is where people actually get in. It’s dark, narrow, and out of view from the street. Cover it.
Mistake 3: Mounting Cameras Too High
If a camera is bolted to the top of a two-storey wall, all you’ll see is the tops of heads. Mount at 2.5 to 3 metres for the best balance of coverage and identification.
Mistake 4: Forgetting About Storage
A great camera with nowhere to store the footage is a fancy paperweight. Plan for at least 14 days of continuous or motion-triggered recording. For a 4-camera system, that usually means a 1TB to 2TB drive.
Mistake 5: Not Testing at Night
Most break-ins happen after dark. Test every camera’s night vision before you sign off. Look for grainy patches, glare from streetlights, or reflections from windows.
Mistake 6: Skipping the Doorbell Cam
The front door is where couriers, tradies, and unexpected visitors show up. A video doorbell paired with a driveway camera is one of the best combos for the money.
Mistake 7: Pointing Cameras onto a Neighbour’s Property
Under the Privacy Act 2020, you need to be careful about recording beyond your boundary. Angle cameras to focus on your land. If the neighbour’s driveway sits in the frame, ask first or adjust the mount.
Frequently Asked Questions
1. How many CCTV cameras do I need for a three-bedroom Kiwi home?
Four to six is the standard answer. One at the front door, one on the driveway, one at the back door, and one on the side path covers the essentials. Add a garage cam and a floodlight cam for driveway if budget allows.
2. Do I need a permit or council approval to install security cameras in NZ?
For a standard residential install where cameras only record your own property, no. If they capture footage of a public area or your neighbour’s home, you have obligations under the Privacy Act. Keep cameras pointed at your section and you’ll be fine.
3. What’s the best height to mount a home security camera?
Between 2.5 and 3 metres off the ground. Low enough to capture faces, high enough that someone can’t easily reach up and cover the lens or rip it off.
4. Are wireless security cameras reliable in New Zealand?
They can be, but they depend on strong Wi-Fi. If your router struggles to reach the back of the section, either use a mesh network, add a Wi-Fi extender, or run one or two wired cameras to the trouble spots.
5. How much storage do I need for a home CCTV system?
For four cameras recording on motion at 2K resolution, 1TB usually gives you around three to four weeks. For continuous recording or 4K, aim for 2TB or more.
6. Should I get a doorbell camera as well?
Yes, if the front door is exposed to the street or courier drop-offs. A doorbell cam pairs neatly with a wider driveway camera to give you two angles on anyone arriving.
7. Can I install security cameras myself?
Wireless setups are very DIY-friendly. Wired NVR systems are doable if you’re handy, but drilling through weatherboard or plaster and pulling cable through the roof space is a job many people prefer to hand over.
8. Do security cameras actually deter burglars?
Visible cameras absolutely reduce the chance of opportunistic crime. Most offenders will move on to an easier target rather than risk being filmed. Keep them visible near entry points for maximum deterrent value.
9. What features should I prioritise for the New Zealand climate?
Weatherproof rating of at least IP66, wide operating temperature range, and strong night vision. Kiwi weather swings hard, so cheap cameras with poor sealing don’t last a winter in Wellington or Southland.
10. Is cloud storage or local storage better?
Local storage on an NVR is more private, doesn’t need a subscription, and works even if the internet drops. Cloud is more convenient for remote viewing and survives if the recorder is stolen. Many families use both.
Final Recommendation
If we had to sum this up in one line: most New Zealand homes need 4 to 6 security cameras, placed to cover every entry point, the driveway, and any blind spots along the side of the house. Don’t get sucked into buying eight cameras just because a deal looks good. Plan the coverage first, and the number will figure itself out.
Start with quality gear, weatherproofed for NZ conditions, with clear night vision and enough resolution to actually identify someone. Match the storage to the number of cameras. Mount them at the right height. And test the system on a wet, dark night before you assume it works.
Good security is about layers. Cameras are one of them. Solid locks, motion-sensor lighting, and switched-on neighbours all add up. Answering the question of how many security cameras do I need is really about answering how you want to feel when you leave the house.
Ready to Build Your Own Security Camera System?
If you’re comparing gear for a security camera system NZ homeowners can rely on, take a look at the range at Annke NZ. You’ll find weather-rated cameras, NVR kits, doorbell cams, and floodlight models that suit anything from a small townhouse in Grey Lynn to a lifestyle block out in the Wairarapa. Choose the setup that matches your property, mount it where it matters, and get back to enjoying your home.
 No products in the cart.